Toilet Tank Parts: Plumbing Diagram, Pictures, Repairs
Last Updated on July 28, 2023 by toilethaven
A toilet has 2 main parts, a tank and a bowl. The tank is usually mounted on top of the bowl so water can flow from the tank to the bowl using gravity during flushing.
The main function of a toilet tank is to supply the bowl with enough water to flush the toilet. In order for flushing to take place, a large quantity of water must be dumped in the bowl suddenly to initiate the siphoning effect.
Since the water pressure in most homes is not sufficient to do this, a toilet tank takes over that role. Tankless toilets have found a way to work without tanks, though. Find out how they work in this post.
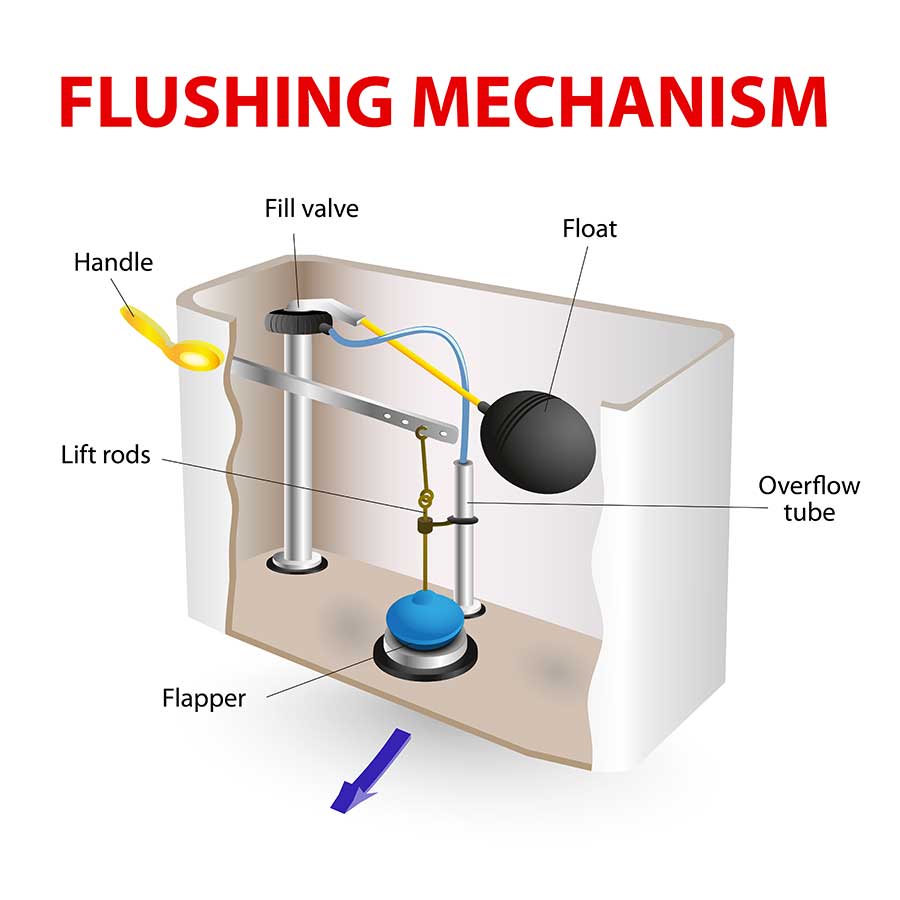
There are 2 types of toilet tank parts—those involved with the flush mechanism and those involved with the refill mechanism. Toilet tank parts involved with the flush mechanism are the tank lever, toilet flapper, and flush valve, while those involved with the refill mechanism are the fill valve, toilet float, and refill tube.
There are 2 types of toilets. One-piece toilets and two-piece toilets. Two-piece toilets have more parts than one-piece toilets and tend to have more problems, especially leaking.
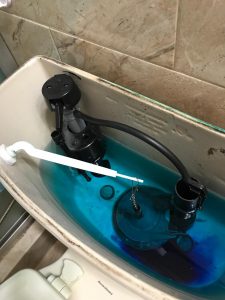
Toilet Tank Parts Plumbing Diagram
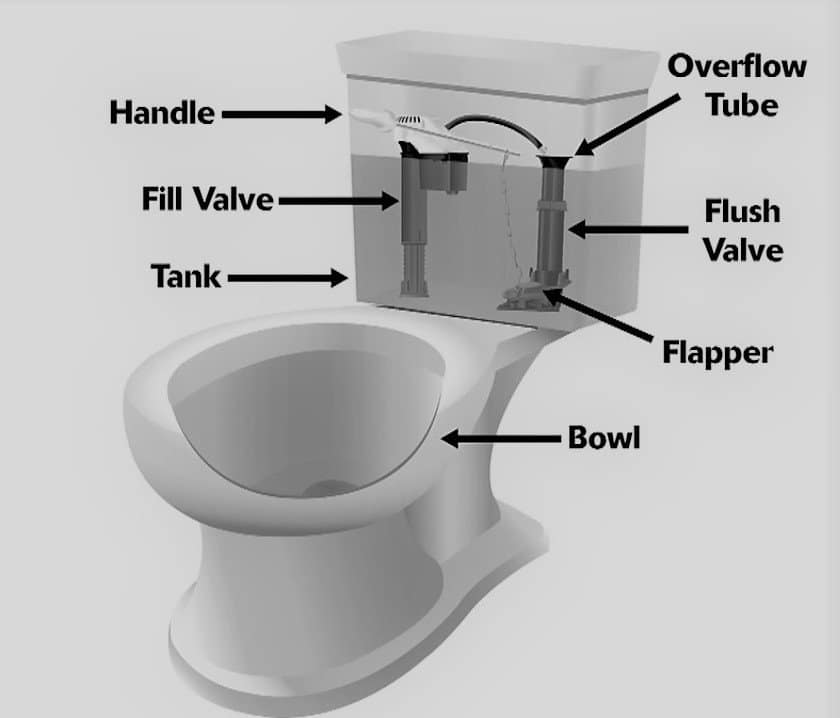
Parts of a Toilet Tank
Most parts of a toilet tank are universal. This is why there are companies like Fluidmaster and Korky selling toilet tank parts, although they don’t have toilets themselves.
You can also buy a replacement toilet tank part from your toilet manufacturer. Knowing your toilet’s model number helps. To do this, remove the toilet tank lid and check on the wall directly opposite from you. The toilet’s model number will be stamped or molded there.
I have written a detailed post reviewing some of the best toilet tank repair kits in the market. Read it here.
You can decide to either replace only one part of a toilet or completely rebuild the entire tank. The former should happen if you have an old toilet that is not flushing as well as it used to.
Now let us look at all the parts of a toilet tank.
1. Toilet Tank Lever
The flushing lever is the toilet handle on the outside of the toilet tank, mostly on the left-hand side. This is where the flushing process starts by pushing the lever downwards.
Toilet tank levers are mostly found in single-flush toilets. Dual flush toilets use push buttons mounted on top of the toilet tank lid.
There is normally a big button and a smaller one. The big button is for a full flush (used to flush solids), while the smaller button is for the half flush.
Sometimes the toilet tank lever gets loose and wiggly or even breaks. Check out how to fix a toilet tank lever in this post.
I have also gone ahead to review some of the best toilet tank handles in the market. Read the review here.
2. Toilet Tank Lid
The toilet tank lid is a cover made from the same material as the toilet tank placed on top of the tank. It prevents dirt from entering the tank and, to some extent, pets.
It is very easy for the tank lid to fall off and break. If that happens, you will need to order an exact one from your toilet manufacturer using the toilet’s model number as a reference.
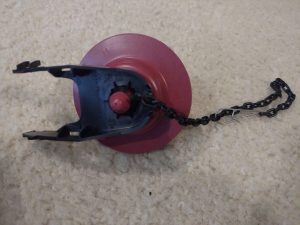
3. Toilet Tank Flapper
A toilet flapper is a rubber seal at the bottom of the toilet tank that allows water to flow out of the tank to the bowl only during flushing but seals off the water movement the rest of the time.
Its opening and closing are regulated by the toilet tank level with the help of a thin link chain. Whenever you have a running toilet, the toilet flapper is usually one of the main suspects.
It is fortunately very easy to replace a toilet flapper. Find out how in this post.
4. Flapper Lift Chain
The flapper lift chain is the think link chain that connects the toilet tank lever and the toilet flapper. When the lever is not being operated, the lift chain is usually slack.
After pushing the lever down during flushing, the chain picks up tension and lifts off the flapper allowing water to flow out to the tank.
You should always ensure a good slack in the lift chain. If it is too slack, the toilet flapper will not open fully, leading to a weak/slow flushing toilet. If it is too tight, it will unseat the flapper and hence a running toilet.
5. Toilet Flush Valve
A flush valve is the opening at the bottom of the toilet tank that allows water to leave the tank and enter the bowl. Flush valves range from between 2 and 4 inches in diameter. A toilet flapper sits on top of the flush valve.
Toilet flush valves at times develop a crack which makes the toilet start leaking between the tank and the bowl. Replacing a toilet flush valve takes more time since it involves removing the toilet tank first. Read more here.
Kohler toilets have different types of flush valves. It is called the canister flush valve. Instead of using the usual toilet flapper, they use a canister that lifts off completely during flushing. Read more about it here.
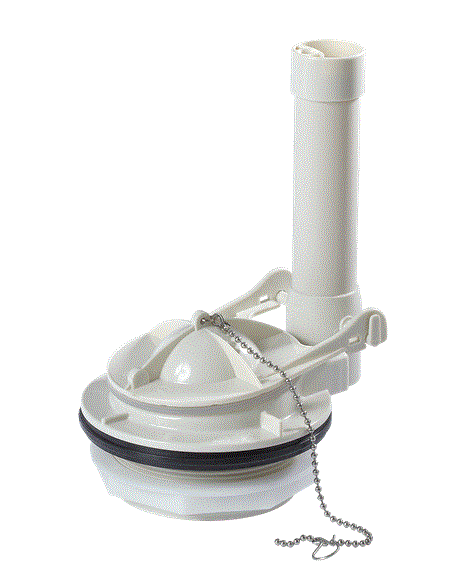
6. Toilet Overflow Tube
The overflow tube is a cylindrical tube mostly found in the middle of the toilet tank that sends excess water from the toilet tank down into the bowl to avoid flooding. It acts as the toilet’s failsafe.
The overflow tube is connected to the toilet flush valve and hence makes sure that in case the tank is continuously being with water, it channels it down to the bowl instead of flooding the bathroom.
The water level in the tank should be about 1/2 below the top of the overflow tube.
7. Toilet Tank To Bowl Gasket
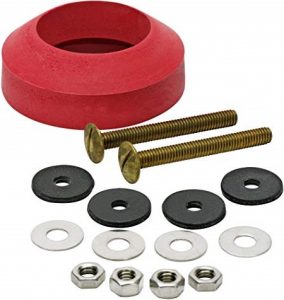
A toilet tank-to-bowl gasket is a rubber seal placed outside and around the flush valve, where the tank sits on the bowl.
It provides a watertight seal preventing water from leaking between the tank and the bowl during flushing. If this happens, it means that the tank-to-bowl gasket (also known as a spud washer) is worn out.
Replacing the toilet tank with the bowl gasket also involves completely removing the toilet tank. Read more here.
8. Toilet Tank Bolts
Toilet tank bolts are also supplied with nuts, steel, and rubber washers. They are used to mount the toilet tank to the toilet bowl.
Modern Kohler toilet tanks are designed in a way that the toilet tank bolts are hooked from underneath the tank in a bracket instead of going through the inside of the toilet tank. This is to reduce the tank-to-bowl leaking problems. They call it the DryLock system installation system.
Toilet tank bolts, after years of usage, become corroded or loose, causing leaks between the tank and bowl. While replacing them, it is important also to take the chance to replace the tank to bowl gasket and, if possible, the flush valve.
9. Toilet Fill Valve
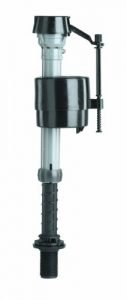
A toilet fill valve is responsible for filling the toilet after each flush. It is connected to the toilet water supply line from underneath the tank to supply it with water continuously.
The toilet float and refill tube are also connected to the toilet fill valve. You will see it installed on the left-hand side of the toilet tank.
A faulty toilet fill valve will be characterized by a toilet tank that won’t fill the toilet, making a hissing sound or even constantly running the toilet.
Replacing a toilet fill valve is s cheap and easy. Check out some of the best toilet fill valves in this review I wrote some time back.
10. Toilet Float Ball
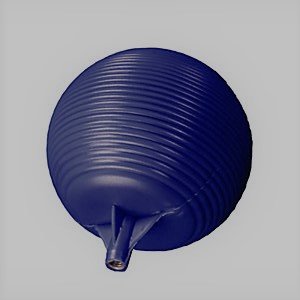
A float ball is a round balloon-like plastic toilet tank part connected to the fill valve by a metallic or plastic arm. It controls the opening and closing of the fill valve.
When the toilet is full and not being used, the float ball is normally at the top of the tank. When the toilet is flushed, the ball falls to the bottom of the tank, a move that opens the fill valve, and the tank starts to fill with water again.
After enough water has filled the tank, the float ball stops, and the fill valve shuts. The toilet is at that time ready to use again.
Float balls are, however, found in old toilet tanks. You will not see a modern toilet with one.
If you would like to replace your old ballcock, as these floats are called, you can easily do it. New floats come together with a fill valve and are very easy to install.
11. The Float Cup
A float cup works just like a float ball but is more compact. It is mounted on the vertical body of the fill valve, where it controls its opening and closing.
Most modern toilets use these types of toilet floats. It allows you to have a compact toilet tank, especially now that toilets use way less water than they used years ago.
Whenever you notice that the water level in your tank or bowl is too low, the problem, most of the time, has to do with the toilet float. Read more on how to adjust a toilet float (and hence the level of water in a toilet bowl/tank) in this post.
12. Refill Tube
A refill tube is a narrow (mostly black tube) that is connected from the fill valve to the overflow tube. When a toilet is flushed, the refill tube sends some water back into the bowl via the overflow tube.
This is the water you always see at the bottom of the toilet bowl. It prevents unpleasant sewer gases from making their way to the bathroom.
The refill must clip on the overflow tube at all times. Without it, no water will be flowing to the bowl hence a low water level in the toilet bowl.
Common Toilet Tank Problems
Here are common problems associated with toilet tank parts and how to fix them.
1. Toilet Can’t Stop Running
When your toilet can’t stop running, 99% of the time, the problem is with your toilet tank. 3 parts of the toilet tank are always the suspects. The flapper, the float ball/cup, and the fill valve are the 3 parts of the toilet responsible for causing continuous running of the toilet.
When the flapper is worn out, or when it is not sitting properly on the flush valve due to mineral deposits, some water will leak from underneath it, and your toilet will continuously be running.
Solution: Replace the flapper if it looks worn out or clean it thoroughly in case it is dirty. It is also a good practice to clean the toilet tank regularly to remove all the dirt.
The floating cup/ball determines the water level in the toilet tank. If their heights are not adjusted properly, more water will fill the tank. The excess water will flow back to the bowl through the overflow tube and hence the continuous running of the toilet.
Solution: Using a screwdriver, look for a screw near the floating ball/valve. Turn the screw once at a time to adjust the toilet tank water lever. Clockwise increases the water lever, and counterclockwise reduces the water level. Shut the toilet water supply valve while doing this repair.
The fill valve opens when the toilet tank is empty and closes after the water has filled the toilet tank. Sometimes it does not work as intended, so it continuously fills the tank with water. The excess water finds its way back to the bowl via the overflow tube and therefore causes continuous running of the toilet.
Solution: Although it is possible to repair the fill valve, the long-term and best thing to do is to replace it.
2. Water Leaking Between The Toilet Tank and The Bowl
If your toilet is leaking between the toilet tank and the bowl, there is a very big chance that the toilet tank to bowl gasket is worn out and needs replacement. While replacing the flush valve gasket, also take the time to replace the tank bolts and washers.
Ensures that the rubber washers are in contact with the porcelain material of the toilet tank. This prevents the toilet tank from cracking if you tighten the bolts too much.
3. Toilet Handle Stays Down After Flushing
A toilet handle is supposed to spring back up after flushing. It is connected to a chain lift which in turn is connected to the toilet flapper. When you flush, the handle moves down, and the chain lifts the flapper off the flush valve. Water runs down to the bowl to flush.
When the flush handle stays down, there is a possibility the lift chain is hooked up to another part of the toilet tank, and hence the handle is unable to move back up.
Solution: Lift off the toilet tank lid and observe the general condition of the lift chain and flapper. If it is hooked anywhere, then go ahead and unhook it.