How to Replace a Toilet Wax Ring Fast!
Last Updated on July 28, 2023 by toilethaven
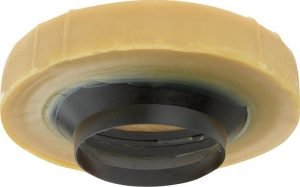
A toilet wax ring is a round seal made from molded wax placed between the toilet’s bottom and the top of the toilet flange. It prevents water from leaking at the base of the toilet during flushing.
If you ever notice your toilet leaking from the base, there is a very big chance that the wax ring is not sealing correctly and will therefore need to be replaced.
Toilet wax ring failure is almost always caused by a wobbling toilet. A wobbling toilet is caused by loose mounting bolts, broken closet flange, soft/weak flooring, and an uneven floor.
Unlike what you may think, replacing a toilet wax seal/ring is quite easy and will not take you more than an hour. However, you may need an extra pair of hands to help you lift the toilet when removing it and installing it back.
To replace a toilet wax ring, turn off the water to the toilet and drain the tank and the bowl. Remove the toilet and scrape off old wax from the top of the closet flange and the bottom of the toilet. Set the new wax ring on the flange and reinstall the toilet. Flush the toilet and confirm no leaks from the toilet’s base.
There is no rule on how often you should replace a toilet wax ring. Toilet wax rings can last for many decades and should only be replaced when they stop sealing, evidenced by water pooling at the toilet’s base or a sewage/urine smell in the bathroom.
The main sign that your toilet needs a new wax ring is when it starts leaking from the base when flushed. Other signs include a leaking basement ceiling or a sewage smell in the bathroom. A wobbling toilet is also another good sign that the wax seal has failed or is about to fail.
When replacing a toilet wax ring, always remove old wax from the bottom of the toilet and the top of the closet flange. Failure to remove the old wax will prevent the new wax ring from sitting and sealing properly, resulting in a leaking toilet.
The wax ring’s size depends on the drainpipe’s size, which has a standard size of either 3 or 4 inches. Most wax rings are, therefore, universal.
Toilet Wax Ring Alternative
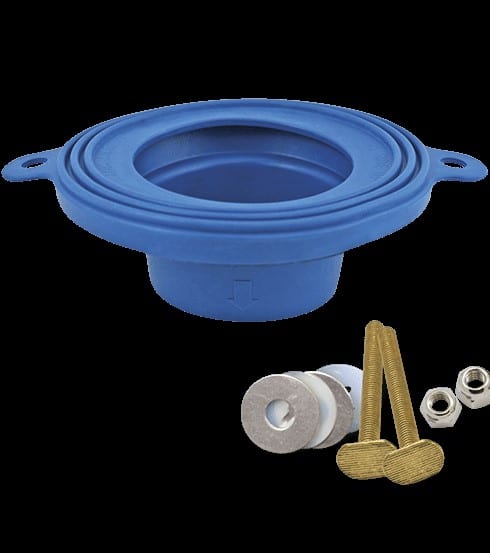
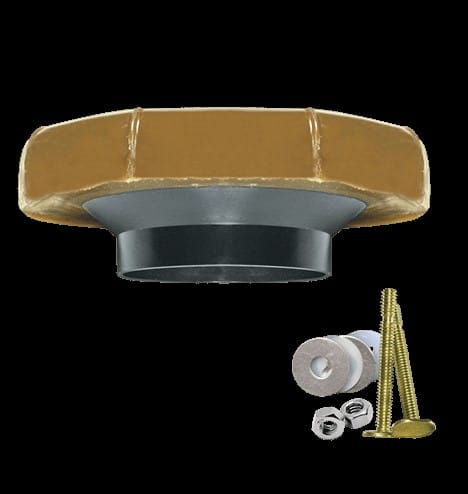
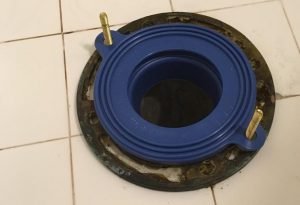
If you do not want to use a wax ring or would like to use a less messy alternative, You should then opt for the rubber gasket seal. The rubber gasket seat works just like a wax ring but is less sticky on hands and surfaces, and as its name suggests, it is made of rubber.
Another advantage of a rubber gasket seal is that it does not deform. That is, however, not the case with a wax ring. Being made from wax makes a toilet wax ring easily deform after slightly applying force.
A deformed wax ring will need to be replaced. Installing it that will have the toilet leaking again.
If this is something that would interest you, Fluidmaster Better than Wax is probably the best toilet rubber gasket seal. Find it here on Amazon
How to Replace a Toilet Wax Ring
To remove and replace your toilet’s wax ring, follow the following steps:
- Turn off the toilet water supply
- Drain the tank and bowl
- Remove the toilet
- Slide out the old wax ring
- Replace the wax ring
- Install the toilet
- Test the wax ring
To successfully and easily replace the wax ring, you will need the following materials and tools:
- Adjustable wrench
- Flathead screwdriver
- Sponge
- Empty bucket
- Old towel/rag
- A new wax ring/seal gasket
- Putty knife
- Toilet bolts and washers (optional)
- Rubber gloves
- Newspapers
- A mini-hacksaw (optional)
Step 1: Turn Off The Toilet Water Supply
- Locate the toilet shut-off valve on the wall behind the toilet.
- To turn off the water, turn this valve clockwise.
- There is a possibility that your shut-off valve is the push/pull type. In this case, pull the valve outwards to stop the water flow to the toilet tank.
Step 2: Drain the Toilet Tank and Bowl
- Flush the toilet and hold the flush trip down. The reason for holding the trip down is to ensure all the water has been flushed down.
- Remove the toilet tank lid and place it away in a safe place. It is made of ceramic and therefore could break easily.
- If you look at the bottom of the tank at this point, you will notice some water left. Put on your gloves and mop it out with a sponge. Squeeze into the empty bucket.
- There is also some water at the bottom of the toilet bowl. Mop that out as well.
- Disconnect the water supply line from the toilet tank. Have a bucket ready to drain any water that might be in the line. Always attempt to disconnect the supply line coupling with your hand before using the wrench.
Step 3: How to Remove a Toilet
As you know or are likely to realize, toilets are not all the same. The following are the 3 toilet types you are likely to come across:
- One-piece toilets
- Two-piece toilets
- Skirted toilets
One-piece toilets are made with the toilet bowl and tank fused together. Two-piece toilets are made with the bowl and tank as separate parts and are joined together during installation. Skirted toilets have a concealed trapway and are a little harder to remove.
While removing a two-piece toilet, you have the option of removing the whole toilet assembly together or removing the tank followed by the bowl. The second method is safer because removing the whole toilet assembly might cause the toilet tank to crack when it is joined to the bowl.
The one-piece toilet is more compact than a two-piece toilet and is normally removed in one go. Toilet tanks can weigh up to 90 pounds, and if your back is not strong enough, please look for an extra pair of hands.
When you are ready to remove the toilet, proceed as follows:
- At the base of the toilet, on each side, there are 2 bolt nuts that anchor the toilet to the toilet flange. Use the adjustable wrench to loosen the nuts.
- Sometimes the nuts are covered with plastic caps. Use the screwdriver to pry the caps off.
- If the bolts and nuts are rusted and won’t come off, use the mini-hacksaw to cut off the nuts. Be careful, however, not to cut the body of the toilet bowl.
- Once the nuts are out, the toilet is ready to come out. Hold the bowl on each side with both hands and rock it a little to break the wax ring seal. Lift it off.
Step 4: How to Remove the Old Wax Ring
- Lay the toilet on its side on the newspapers already spread on the floor.
- Plug off the toilet drainpipe with a rag or towel. This will prevent sewer gases from entering the bathroom and the entire house.
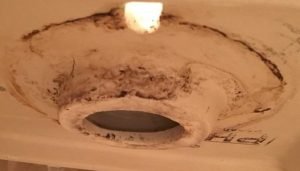
- On the toilet outlet, you can see the old toilet wax ring. Slide it out. This can be a little messy.
- Using the putty knife, scrape off old wax from the top of the closet flange and toilet outlet.
- Check the toilet flange’s status to ensure it is not damaged. Replacing a damaged/broken toilet flange is easy. Here is how.
Step 5: How to Replace the Toilet Wax Ring
- Replace the toilet flange and bolts if they are damaged or corrupted.
- Push the new wax ring gently on the toilet outlet, careful not to deform it.
- One trick most plumbers use is leaving the wax ring outside in the sun or warm water to make it easier to slide onto the toilet outlet.
- Some people prefer setting the wax ring on top of the flange and installing the toilet on top. The problem with this technique is that you will not be sure if the wax ring will form a good seal since it might shift while installing the toilet.
- If you decide to replace the wax ring with a rubber gasket seal, you will set the gasket on top of the flange and then install the toilet on top of it.
Step 6. How to Install the Toilet
- Once the toilet flange and bolts are well positioned, it is time to install the toilet.
- Before you install the toilet, remove the rag from the drainpipe.
- Lift the toilet perpendicular to the toilet flange and lower it slowly.
- It is always hard to control the weight of the toilet and align the toilet to the two bolts. Therefore, getting someone to help with alignment would be beneficial.
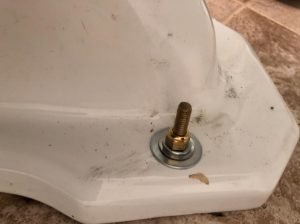
- Once the toilet is solid on the ground, put a washer and a nut on each bolt and hand-tighten it.
- Once the nuts are hand-tight, use a wrench to tighten the 2 nuts alternatingly. It is best to tighten the nuts alternatingly to ensure the toilet is level. If you tighten one side before tightening the other one, the toilet will slant to one side.
- Use the mini-hacksaw to cut off the bolts if they are sticking too far out.
- Cap off the nuts with color-matched caps (optional.)
Step 7: Test the New Wax Ring
- Connect the supply line back to the toilet tank.
- Open the shut-off valve and let the water fill the toilet tank.
- Flush the toilet and look for any leaks at the base of the toilet.
- Flush the toilet a couple more times just to be certain there are no leaks.
- Place the toilet tank lid back on.
And that is how to replace a toilet wax ring like a pro.
How to Replace a Toilet Wax Ring in a Two-Piece Toilet
It is also an easy task if you have a two-piece toilet and decide to remove the tank and then the bowl. Assuming you have emptied the toilet tank and shut off the water supply, proceed as follows:
Hot to Remove the Toilet Tank
- The tank is installed on the bowl using 2 or sometimes 3 bolts. Loosen them using an adjustable wrench from underneath the tank.
- If they don’t loosen but instead start to pivot, you will have to use 2 tools.
- Look inside the toilet tank for the two bolt heads.
- Run your hand underneath the toilet bowl to locate the two bolt nuts that tighten the tank on the bowl.
- Using your long screwdriver, unscrew the bolts from inside the tank as you back off the nuts from underneath the bowl.
- When the bolts are out, lift off the tank.
- Place the tank in a safe place where it cannot fall off and crack
Once the toilet tank is out, you can remove the toilet bowl. To install the toilet tank, follow the same easy steps as above.
How to Replace a Toilet Wax Ring of a Skirted Toilet
Replacing a toilet wax ring in a skirted toilet is the same as replacing it in a non-skirted toilet. The problem with a skirted toilet is accessing the toilet bolts since they are inside the skirt.
Some skirted toilets use the normal toilet bolts, while others have a bracket installed on the trap—the bracket-type use horizontal screws to hold the toilet to the bracket assembly.
However, The most important thing is knowing how to access the toilet bolts or screws. On each side of each skirted toilet, there is a small hole covered in a color-matched cap.
Once you remove the cap, you will have easy access to the toilet bolts and should be able to remove it easily.
Conclusion
Replacing a toilet wax ring is not a hard task. The most important thing is to work safely. Most bathrooms are slippery, so the risk of sliding and falling is high.
Toilets are heavy objects which also break easily. We always recommend that you have someone to help you with the lifting.
Other than that, knowing how to replace a toilet wax ring can save you good money because a plumber would even ask for upwards of $100.