Toilet Leaks When Flushed? Here is How to Fix it Fast
Last Updated on July 28, 2023 by toilethaven
Why Does My Toilet Leak When Flushed?
A leaking toilet is characterized by water pooling around the base or a damp basement ceiling. Toilets will most likely leak between the tank and the bowl or around the base when flushed.
A toilet that leaks when flushed is caused by loose tank bolts, a cracked bowl, a worn-out tank-to-bowl gasket, a broken closet flange, a worn-out wax ring, or even a cracked flush valve. The first step to fixing the problem is to identify the source of the leak.
If your toilet leaks between the tank and the bowl when flushed, it is a sign that the tank-to-bowl gasket (spud washer) is worn out or the tank bolts are loose. When flushed, a toilet leaking from around the base indicates that the wax ring is not sealing.
A hairline crack on the toilet bowl can also cause it to leak. If the crack extends to the bottom of the toilet/toilet trap, you will notice that the bowl cannot retain any water, and a foul smell will fill the bathroom.
Worn-out toilet tank bowl gaskets and toilet wax rings are the ones responsible for most toilet leaks.
Replacing the toilet tank to bowl gasket and tank bolts will fix a toilet that leaks between the tank and the bowl when flushed. If your toilet leaks from its base when you flush, you will need to replace the toilet wax ring assuming the bowl is not cracked.
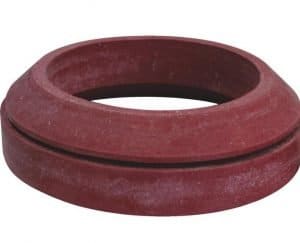
What is A Toilet Wax Ring?

A toilet wax ring is a thick wax molded on a plastic ring that provides a watertight seal between the bottom of the toilet and the top of the toilet flange. It also prevents sewer gases from entering the bathroom and the entire toilet.
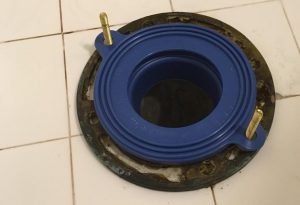
A toilet or closet flange is a round pipe fitting screwed into the bathroom floor that connects the toilet to the drainpipe. Two bolts connect the closet flange and the toilet, securing the toilet firmly on the floor.
A wax ring is sandwiched between the flange and the toilet. An alternative to using a wax ring is a rubber gasket seal. The rubber seals are less messier than wax rings.
If your toilet leaks from the floor or basement ceiling, the wax ring is not sealing as it should. This is mainly caused by a broken toilet flange or loose toilet bolts, which makes the toilet wobble. A wobbly toilet will, after some time, unseat the wax ring and hence the leak.
What is a Toilet Tank to Bowl Gasket?
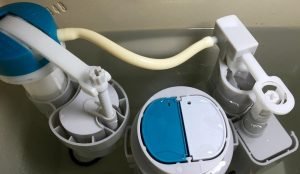
A toilet tank-to-bowl gasket, also known as a spud washer, is a rubber gasket that provides a watertight seal between the toilet tank and the bowl. It is typically installed outside the flush valve, where the flush water leaves the tank and enters the bowl.
If your toilet leaks when flushed between the toilet tank and the bowl, it means the toilet tank-to-bowl gasket is worn out, tank bolts are loose, or the flush valve is cracked. This, however, only happens on two-piece toilets, and to fix the problem, you will most likely have to remove the toilet tank.
How to Fix a Toilet That Leaks When Flushed
Materials Needed
- A wax ring/ rubber seal
- Tank-to-bowl gasket with bolts, nuts, and washers
- Adjustable wrench
- Flathead screwdriver
- Putty knife
- Sponge
- Empty bucket
- Mini-hacksaw (optional)
- Rubber gloves
- Newspapers
- Old rag/towel
1. How to Fix a Toilet that Leaks at the Base When Flushed
When your toilet leaks from the base when flushed, you will need to remove the toilet to replace the wax ring causing the leaks. An upstairs toilet that leaks when flushed will be noticed by water in the ceiling or the basement.
To fix a toilet that is leaking from the base, you must replace the wax ring with another wax ring or rubber gasket. Let us see how you replace a toilet wax ring.
Step 1: Disconnect Water to the Toilet
- Look for the toilet shut-off valve. It is located at the rear wall of the toilet, mostly on the left-hand side.
- Turn this valve clockwise. If you have the push/pull valve, pull it outwards to turn off the water to the toilet tank.
Step 2: Drain the Toilet Tank
- Flush the toilet and hold the lever down to flush as much water as possible.
- Remove the toilet tank lid and place it away in a safe place. It can crack easily.
- A small amount of water is still left at the bottom of the toilet tank. Use the sponge to soak and squeeze it into the empty bucket.
- Look for the water supply line connecting the shut-off valve to the underside of the tank. Disconnect it. Always attempt to disconnect it with your hand before attempting with a wrench.
Step 3: Remove the Toilet
- Prior to removing the toilet, you will need to remove the water at the bottom of the bowl. Otherwise, it will make a big mess once you remove the toilet.
- Use the sponge to soak up and empty the water into the bucket. Remember to have your gloves on.
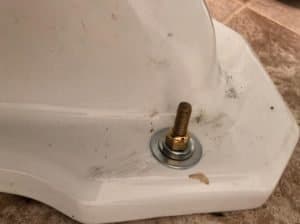
- Once the bowl is dried, look for the two bolts on each side of the toilet. Sometimes they are covered with plastic caps. Pry the caps off with the screwdriver.
- Using the wrench, loosen the two nuts, then remove them completely with your hand.
- If the bolts are corroded or just can’t come off, use the mini-hacksaw to cut the nuts off, being careful not to cut the toilet body.
- Once the nuts are out, hold the toilet bowl with both hands and rock it a little to break the wax seal completely. Lift it off and place it on its side on the newspapers.
- To prevent sewer gases from entering the bathroom, plug off the drainpipe with the rag/towel.
- Remove the old wax ring and throw it away. Wax rings cannot be reused.
- Scrape off old wax sticking on the toilet flange and outlet with a putty knife.
- Inspect the status of the toilet flange. It will need to be replaced if worn out or broken. Replacing a toilet flange, especially now with the toilet off, is easy.
Step 4: Install New Wax Ring/ Gasket Seal
- To make the wax ring slide easily into the toilet outlet, a simple trick you should employ is to leave it outside in the sun for a while or dip it in warm water for a few minutes.
- If you had cut off the old bolts, put new ones in place.
- Slide the wax into the toilet outlet gently, careful not to deform it.
- If you use the rubber gasket seal, install it on top of the flange. It has holes that go through the bolts to hold it in place.
Step 5: Install the Toilet
- Remove the rag/towel from the drainpipe.
- Lift the toilet above the toilet flange and lower it gently to align the bolts to the two holes in the toilet. If you can have someone to help you with the alignment, then call them in to help.
- Once the toilet has sat on the flange, hold it by the bowl with both hands, rock it, and push it down gently to fully engage the wax seal.
- Put a washer and a nut on each bolt and tighten with the wrench.
- It is important to tighten the bolts alternatingly to keep the toilet level. Do not, however, tighten the bolts too much, as this can crack the toilet bowl.
- If the bolts are too high above the nut, cut them off with a hacksaw.
- Install the plastic caps on the nuts. The caps are only for aesthetic purposes.
Step 6: Reconnect Toilet Water Supply.
- Connect the water supply line back to the toilet tank.
- Open the water shut-off valve and let the water fill the tank.
- Flush the tank several times and look for leaks at the toilet’s base.
- Put the toilet tank lid back on.
If your toilet leaks when flushed and the wax ring is the problem, this repair should fix it. It is always advised that you fix it quickly to prevent the subfloor from rotting, especially if it is wooden.
A toilet that leaks from the base when flushed can also bring a foul smell. This is because urine or a mixture of urine and feces may leak into your bathroom floor or the subfloor.
To caulk or not to caulk the base of the toilet comes down to personal preference. If you decide to caulk around your toilet, leave a small opening at the back of the toilet. This way, if your toilet leaks, you will be able to notice the water on the floor.
2. How to Fix a Toilet that Leaks Between the Toilet Tank and Bowl When Flushed
When your toilet leaks when flushed between the toilet tank and the bowl, the culprit is the toilet tank-to-bowl gasket, also known as a spud washer. If you have a wobbly toilet tank, it also means that this gasket is not sealing properly, and hence the water will leak when the toilet is flushed. The gasket could also be worn out.
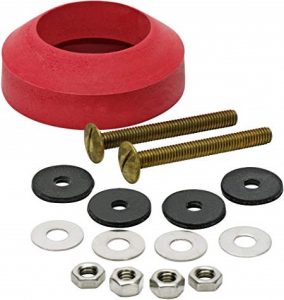
To fix a toilet that leaks when flushed between the tank and the bowl, you will need to replace the toilet tank to bowl gasket. A new toilet tank to bowl gasket comes with toilet tank bolts and metallic and rubber washers.
In order for you to replace the toilet tank with a bowl gasket, therefore, you will first need to remove the toilet tank.
How to Replace the Toilet Tank to Bowl Gasket.
As mentioned, to replace the toilet bowl gasket, you first need to remove the toilet tank. Loose toilet bolts can be easily tightened using a wrench, but corroded ones should be replaced.
Step 1: Drain the Toilet Tank
- To disconnect water from the toilet, turn off the shut-off valve. This valve will be located on the rear wall of the toilet on the left-hand side.
- Turn the valve clockwise. If you have a push/pull valve, pull it outwards.
Step 2: Empty the Toilet Tank
- Flush the toilet tank and hold down the flush handle to flush out as much water as possible.
- Use the sponge to mop out any remaining water in the tank and squeeze it into the bucket.
Step 3: Remove the toilet tank
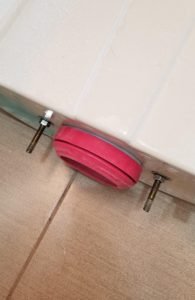
- When you look inside the toilet tank, you will see the toilet tank bolt’s heads. They are tightened from underneath the toilet bowl with nuts.
- Loosen and remove the nuts and washers from underneath the toilet bowl using a wrench.
- At this point, the tank is free, and you will only need to lift it off and place it on top of an old towel or rag.
- The toilet tank to bowl gasket is found on the outer part of the flush valve covering the entire flush valve nut. Simply slide it out.
- Push and remove the two bolts from the inside of the tank.
Step 4: Replace the Tank with Bowl Gasket
- Slide the new gasket where the old gasket was and ensure it covers the entire flush valve nut.
- Slide a metal wash into each bolt, followed by rubber washers. Feed the bolts and washers into the bolt holes from the inside of the tank.
It is important to make sure that the washers that come into contact with the toilet’s body are made of rubber. This will prevent the tank from cracking if you tighten it too much and prevent the tank from leaking from the bolts.
Step 5: Install the Toilet Tank
- Lift the tank and guide the bolts through the holes in the toilet bowl. Make sure it is sitting pretty on the bowl.
- Put in a rubber washer, then a metallic one, followed by a nut into each bolt. Use the wrench to tighten them alternatingly.
- Ensure the toilet flapper and the fill valve did not shift during this repair if they put them back in place.
Step 6: Reconnect the Toilet Water Supply
- Connect the water supply line back to the toilet tank. Do not use a wrench to tighten it.
- Open the shut-off valve and let the water fill the tank.
- Flush the toilet a couple of times and check for leaks between the tank and the bowl.
If a toilet leaks when flushed and the problem is the toilet tank to bowl gasket, this repair should fix it.
When you are satisfied that the toilet is no longer leaking, put the lid back on and clean your work area.
Conclusion
If you decide to do it yourself, a toilet that leaks when flushed can be fixed easily at a low cost. However, you can always call a professional plumber if you try to fix it unsuccessfully.