How To Shim a Wobbly/New Toilet
Last Updated on July 11, 2023 by toilethaven
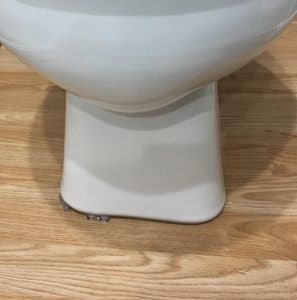
Toilet shims are thin plastic or rubber tabs used to level a toilet. You can also use homemade wooden shims or stainless steel coins. If a toilet is installed on an uneven floor or if the toilet flange is too high off the floor, the toilet will need to be shimmed.
If you notice that your toilet is wobbling/rocking, you will need to shim it. A wobbly toilet poses a great danger to the user, especially if they are elderly or disabled.
How to Level a Toilet Using Toilet Shims
To shim or level an uneven toilet, start by loosening the toilet bolts a little. Insert the shims around the toilet until it feels firm. Tighten the bolts and cut the sections of the shims sticking out. If you don’t have proper toilet shims, you can use coins or even bolt washers.
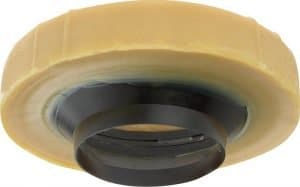
Apart from that, a rocking/wobbly toilet will, with time, unseat the toilet wax ring. The wax ring is the toilet seal sandwiched between the bottom of the toilet and the toilet flange. It provides an air and water-tight seal containing sewer gases and flush water.
If the integrity of the seal is compromised, in this case by the wobbly toilet, flush water, which will have traces of urine and feces, will start leaking from the base of your toilet. Sewer gases will also reign supreme in the bathroom.
It is, therefore, crucial that you learn how to shim a toilet and always do it as soon as it starts to wobble or when installing a toilet on an uneven surface. It is, however, not all wobbly toilets that need to be shimmed.
Sometimes the toilet bolts become loose, and therefore the toilets start to rock about. Check this detail out before going ahead to shim the toilet. Use an adjustable wrench to tighten the toilet bolts but not too much that you crack the toilet bowl.
How to Shim a Toilet
Shimming a toilet will depend on whether you are shimming a toilet that is already installed and rocking or shimming a new toilet that you are installing. It could also be that you are installing a toilet on a toilet flange that is higher than the recommended height from the floor (1/4 inch)
How to Shim a Wobbly/Rocking Toilet
Before going ahead to shim the toilet, check the base of the toilet to make sure the toilet is not leaking. If you notice a little bit of water collecting around the base of the toilet, it means your toilet wax ring is not sealing and will need to be replaced before shimming the toilet.
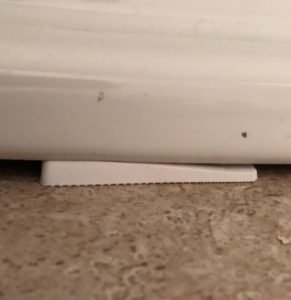
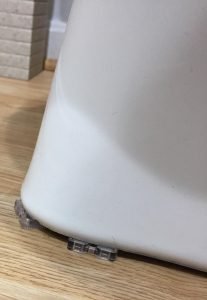
If the toilet is just wobbly and not leaking, go ahead and shim it. The best toilet shims have a ribbed design that enables them to be double-stacked.
Suppose you have a spirit level place it on the bowl to know which side of the floor the toilet is slanting. If you don’t have the spirit, there is no need to worry. Hold the toilet bowl with both hands and rock it a little to see which side has a gap. This is better done when you are in a kneeling or squatting position.
Start sliding the shims, making sure you put them at the front and back to distribute the toilet pressure evenly. As you add the shims, keep trying to see if the toilet is stabilizing by rocking it about or by sitting on it.
Some people normally tap the ends of the shims with a hammer to drive them in more. This is not advisable because you can end up unseating the wax ring, resulting in a toilet leak.
A good trick is to loosen the toilet bolts, which will help you insert the shims, then tighten the toilet after the shims are in place. When you are satisfied that the toilet is solid on the floor, use a sharp knife to cut off the protruding ends of the shims.
How to Shim a New Toilet/Wobbly Leaking Toilet
If a toilet has been wobbling for a long time without being shimmed, it is bound to start leaking. The way forward is to remove the toilet, replace the wax ring and then reinstall the toilet. This is also how you would shim a new toilet you install for the first time.
Step 1: Turn off the water next to the toilet
- Look for a shut-off valve on the left-hand side of the toilet and turn it clockwise.
- Flush the toilet and hold the lever down to get out as much water as possible.
- Remove the toilet tank lid and place it away in a safe place.
- Use a sponge to remove the small amount of water left at the bottom of the toilet tank.
- Disconnect the water supply line from the toilet tank. The water supply line is the braided line that runs from the shut-off valve to the toilet tank. Loosen it with your hand before attempting to loosen it with a wrench if it is too tight.
- Use the sponge to remove the water at the bottom of the toilet bowl. Once the bowl and tank are dry, it is time to remove the toilet.
Step 2: Remove the Toilet
- Look for a bolt on each side of the toilet. Sometimes the bolts are covered with plastic caps. Pry the caps off.
- Use an adjustable spanner to loosen the bolts, and if they are rusty, cut them off with a miniature hacksaw.
- Hold the toilet by the bowl, rock it about to break the wax seal, lift it off, and lay it on its side on some newspapers.
- Plug off the drainpipe with a rag to prevent sewer gases from entering your bathroom.
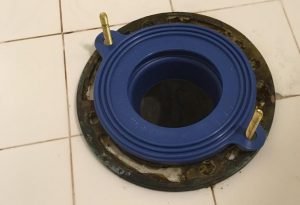
- Remove the old wax ring and trash it. Wax rings cannot be reused.
- Using a putty knife, scrape off old wax from the toilet outlet as well as on top of the toilet flange.
- Inspect the condition of the toilet flange to see if it warrants a replacement. Replacing a toilet flange with the toilet already removed is an easy task.
Step 3: Install the Toilet without the Wax Ring
It is easier to map out the areas where you need to shim the toilet without the wax ring. This is because, without the wax ring, the toilet is less rigid.
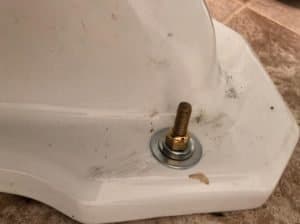
- If you had cut off the toilet bolts, slot in new ones in the toilet flange and install the toilet, but don’t tighten it.
- Start looking for gaps from underneath the toilet and slide in the toilet shims. Once the toilet is solid on the floor, mark the areas where you have installed the shims.
- Remove the toilet and lay it on its side.
Step 4: Replace the Wax ring
Whether installing a wax ring on a new toilet or replacing a wax ring on an old toilet, this is how to proceed:
- Gently slide the wax ring into the toilet outlet, careful not to deform it. An easier way of doing it is by putting it in warm water for a few minutes or in the sun for a little while. This makes it easier to slide in.
- An alternative for using toilet wax rings is rubber gasket seats which work the same way as wax rings but uses rubber seals instead of wax seals and are less messy.
Step 5: Install the Toilet and Shim it
- Remove the rag from the drainpipe.
- Lift the toilet above the flange to align it with the toilet bolts and put it down gently.
- Slide in the shims on the previously marked spots, pushing them in gently with your hand.
- Put in a washer and a nut on each bolt and tighten. Tighten the bolts alternatingly to keep the toilet level. Remember, the bowl is made of ceramic, so don’t tighten it too much lest you crack it.
- Seat the toilet and ensure it is comfortable and sturdy.
- Cut the shim ends with a knife cleanly at an angle so that the shim’s edges are not visible.
Step 6: Connect Back Toilet Water Supply
- Connect the water supply line to the toilet tank and turn on the shut-off valve counterclockwise.
- Flush the toilet a couple of times and check the base to ensure no leaks.
- Put the toilet tank lid back on.
And that is how to shim a toilet. As we have seen, it is always advisable to shim the toilet way in advance before it starts leaking. Even if your toilet is not rocking but is still installed on an uneven floor, you will not be comfortable on the throne.
Should you caulk around the Toilet?
One of the biggest debates around toilets is whether you should caulk around the toilet to the floor or you shouldn’t. Personally, I say you should caulk it.
The main reason caulking around a toilet is opposed by many people is that if the toilet is caulked and then it happens to be leaking, you would then have no way of knowing, which would lead your subfloor to rot if it is wooden.
There is, however, a way around it, and the benefits of caulking around the toilet outweigh those of not caulking. Apart from aesthetic purposes, a caulked toilet is easy to clean and keeps smells at bay.
A shimmed toilet that is not caulked will have a gap between it and the floor. Cleaning that place will always be a daunting task. If you also have a small boy who has not mastered aiming at the bowl yet, he will spill urine on the floor, which will flow and dry from beneath the bowl resulting in a pungent smell. Roaches can as well find a place to hide.
Related Article: Why You Should Caulk Around Your Toilet
How to Caulk a Toilet
The best way to caulk a toilet such that it looks decent and you are also able to detect a leaking toilet is to caulk around the toilet and only leave a small gap at the back of the toilet. That way, you can see water around the base of the toilet if the toilet starts leaking.