Why Your Toilet Tank is Not Filling Up and How to Fix It
Last Updated on July 14, 2023 by toilethaven
Why is My Toilet Tank Not Filling with Water?
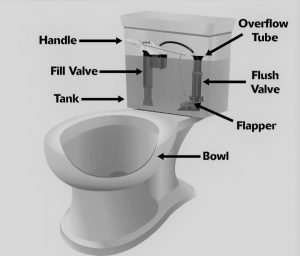
A toilet tank is designed to refill with water every time it is flushed. The water level should be about ½ inch below the overflow tube and should take about 10 seconds to refill. If your toilet is not filling with water or filling slowly, we will tell you how to fix it.
When a toilet is not filling up with water, it is a sign of a faulty fill valve, the wrong height of the toilet float, a leaking flapper, a cracked overflow tube, or low water pressure. When the toilet tank doesn’t fill at all after flushing, make sure the shut-off valve is fully open.
What To Do When Your Toilet Tank Won’t Fill?
1. Adjust The Toilet Float
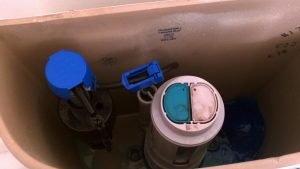
Your toilet will either have a float ball or a float cup/cylinder. Float balls are mostly found in old toilet models, while float cups are installed in modern toilets and are considerably smaller in size.
A toilet float is connected to the toilet fill valve and controls the opening and closing of the valve. When the toilet float is set too low, the water level in the tank will also be low.
If, on the other hand, it is set too high, excess water will fill the tank and flow down to the toilet bowl via the overflow tube. This is normally one of the problems when a toilet can’t stop running.
How to Adjust the Toilet Float
- Reach the back of the toilet and turn off the water supply to the toilet by turning off the shut-off valve. Turn it clockwise or pull it out if you have a push/pull valve.
- Flush the toilet holding the lever down long enough to get out most of the water.
- Remove the toilet tank lid and place it away in a safe place.
- Check if you have a float ball or a float cup.
- If you have a float ball, check where the float arm connects to the fill valve for a screw. Using a screwdriver, turn this screw clockwise to raise the water level in the toilet tank.
- With a float cup, look for a long plastic screw connected to and alongside the float. Use a screwdriver to turn it clockwise to raise the water level in the toilet tank.
- During the adjustments, do not turn the screws too much at once. Keep turning, opening, and closing the water supply until the water level is about ½ below the overflow tube.
- Put the toilet tank lid back on
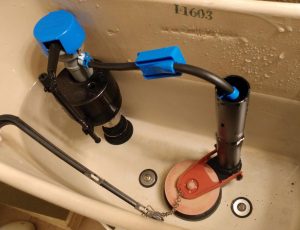
2. Replace the Fill Valve
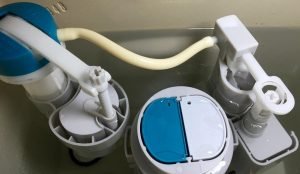
The fill valve is the toilet tank part connected to the water supply line. It is responsible for filling the tank with water after flushing. On the inside, it is also connected to the refill tube and the toilet float.
After flushing, the toilet float moves to the bottom of the tank, a move that opens the fill valve. As the water starts filling the tank, the float moves up gradually until the tank is full. The refill tube sends a small amount of water down to the bowl through the overflow tube to prevent sewer gases from coming up to the bathroom.
If your toilet’s fill valve is faulty, the tank will not fill up with water. Most often, the fill valve does not fill the toilet with water because of accumulation of debris from the water supply, or the valve is just too old, and its seals are worn out.
If your fill valve is fairly new and you suspect there might be debris inhibiting the water flow into the tank, you can easily fix it. This will most likely be exhibited by a slow-filling toilet.
Do you know the best fill valve to buy for a toilet? These ones here are some of the best.
How to Fix a Toilet Fill Valve

- Turn off the water supply to the toilet.
- Flush the toilet.
- With one hand, hold the shaft of the fill valve at the bottom and use the other hand to give the fill valve cap a 1/8 turn counterclockwise to remove it.
- Inspect the holes on the valve seat for debris.
- Hold an empty cup over the fill valve to avoid water splashing, and fully open the water supply to the toilet. The water pressure should force the debris out.
- When the valve is unblocked, put the fill valve cap back on.
If you have an old/worn-out fill valve, you should replace it. Fill valves are inexpensive, and sometimes it makes more sense to replace than repair.
Replacing a fill valve is also fairly easy, and you don’t need to pay a plumber. Fluidmaster and Korky make some of the best fill valves.
How to Replace a Toilet Fill Valve
- Turn off the water supply to the toilet.
- Flush the toilet and hold the lever down to remove as much water as possible.
- Disconnect the water supply line. The supply line is connected to the toilet tank using a coupling which you should turn counterclockwise to remove. Do this with just your bare hand and not a wrench.
- Next up, remove the lock nut by also turning it counterclockwise.
- Remove the refill clip from the overflow tube.
- Lift of the fill valve.
- Clean the area where the new fill valve will sit.
- Adjust the height of the fill valve. Fill valves are adjustable to fit different sizes of tanks. To do this, grab the top section of the fill valve and turn the bottom threaded part counterclockwise to increase its length.
- Ideally, the top of the fill valve cap should be 3 inches above the top of the overflow tube.
- Slide in the fill valve and secure it with the lock nut.
- Connect the supply line back.
- Attach the refill tube to the overflow tube.
- Open the water supply to the toilet.
- Adjust the level of water in the toilet tank if need be.
3. Replace the Toilet Flapper
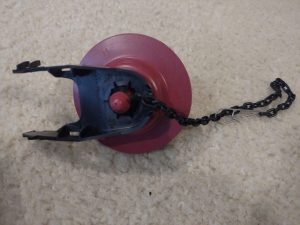
If you have a toilet that is not filling, but water is running, the problem might be with your toilet flapper. A toilet flapper is a rubber seal at the bottom of the toilet tank that opens to allow flush water to enter the toilet bowl and makes a seal after flushing to enable the toilet tank to fill and hold water for the next flush.
The flapper is connected to the toilet handle using a lift chain. The chain should have a ½ inch slack. If the chain is too tight or it hooks to another part of the toilet tank, it will unseat the flapper. Your toilet will, therefore, not fill with water, and it will continuously be running.
Another problem associated with the lift chain is when its end is hanging loosely inside the toilet tank. After flushing, it can enter the flapper hole, and therefore the flapper will not seal properly. You will then have a toilet that can’t stop running and will not fill.
Sometimes minerals and debris present in the water can collect under the toilet flapper and also on the flush valve opening. As a result, the flapper will not seal, and you will have a running toilet and toilet tank that is not filling with water. Cleaning the flush valve and flapper with running water should solve the issue.
If, on the other hand, the flapper is just worn out or warped, it is prone to leaking and is best replaced. Here is how to replace a toilet flapper:
How to Replace a Toilet Flapper
- Turn off the water supply to the toilet. You will find the shut-off valve behind the toilet. Turn it clockwise.
- Flush the toilet and hold the lever down to remove as much water as possible.
- Remove the toilet lid and place it away in a safe place.
- Unhook the lift chain from the handle arm.
- Remove the pegs attaching the flapper from the overflow tube and lift it off.
- Clean the area where the new flapper will sit thoroughly.
- Install the new flapper and connect the pegs to the overflow tube.
- Hook the lift chain to the handle arm.
- Open the water supply to the toilet.
- See that the toilet tank is filling fast enough and there are no leaks
- Place the toilet tank lid back
4. Replace the Overflow Tube
The toilet overflow tube is a large tube in the middle of the toilet tank that channels excess water in the toilet tank down to the toilet bowl to avoid overflowing.
Although not often, the overflow tube can crack and continuously send the water in the tank down to the toilet bowl. If you, therefore, have a toilet that is not filling but water is running, this could be the issue.
Replacing an overflow tube is a cinch. Just pull it out of the flush valve base and install the new one. Make sure to buy the right size of the flow tube.
Alternatively, you can replace the entire flush valve (which the overflow is a part of). I have written a detailed guide on how to do it. Read it here.
5. Check the Toilet Water Pressure
If you have a slow-filling toilet, apart from a faulty fill valve, the other likely reason is the water pressure to your toilet is too low. This is caused by clogged old pipes or water pipes that are leaking.
The first thing to do here is to determine if the low water pressure only affects your toilet or all the other fixtures in your home. If it is only the toilet, you can start by checking if the water supply line is blocked.
Just remove it and blow air through it. If it looks fine, the problem might be with the main water pipe. Call in a professional plumber to help you to fix it.
6. Open the Shut Off Valve
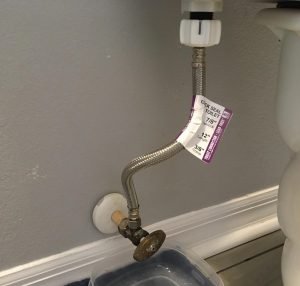
If a toilet tank is not filling, the first thing to do is check if the shut-off valve is open. Locate it at the rear wall of the toilet. To open it, turn it counterclockwise.
Some toilets have a push/pull valve. Push the valve handle in to open the water supply to the toilet. It is a simple fix, but if you don’t know where to look or where to check, your toilet will not fill with water after the first flush.