How to Install a Toilet From Scratch – 8 Steps
Last Updated on August 1, 2023 by toilethaven
Installing a toilet from scratch may seem daunting, but it is very easy. Depending on the location and job difficulty, a plumber will charge you between 125 to 300 dollars to install a toilet. DIYing it will save you as much.
There is a difference between installing a toilet from scratch and replacing one. While replacing a toilet, you already have an old toilet that you want to remove and install a new one.
Installing a toilet from scratch means installing a toilet where none has existed before, typically in a new bathroom. If you want to know how to replace a toilet, check this detailed post out.
Installing a toilet from scratch involves the following steps:
- Install the shut-off valve
- Install a toilet flange
- Install the wax ring
- Install the toilet bowl
- Install the toilet tank
- Test the new toilet
- Install the toilet Seat
Materials and Tools Needed
- New toilet
- Shut off valve
- Water supply line
- Toilet Flange
- Wax ring
- Pipe cutter
- Internal pipe cutter
- Drilling machine
- Adjustable wrench
- Screwdriver
- Pipe glue
- Measuring tape
- Mini hacksaw
Buying the Materials
People always struggle to buy a good toilet. A toilet is a long-term investment; you will surely want the best one possible. If carefully selected, the best toilet can serve you for a long time.
You need to check out several things before buying a toilet. First, you will need to determine your toilet rough-in. The rough-in is the distance between the rear finished wall and the center of the toilet drainpipe.
While measuring a rough-in, make sure that you measure from the finished wall and not the baseboard. The standard toilet rough-in is 12 inches, although some toilets have a 10 or 14-inch rough-in.
The next thing you will need to know is your toilet dimensions. This includes the height, width, and depth/length. If you have a small bathroom, you should consider buying a small/compact toilet.
To learn more about everything you should consider before buying a toilet, check out this post.
Go ahead and buy the shut-off valve, the supply line, the toilet flange, and the wax ring. You may also use a rubber seal gasket instead of a wax ring since it is less messy/gross.
How to Install a Toilet
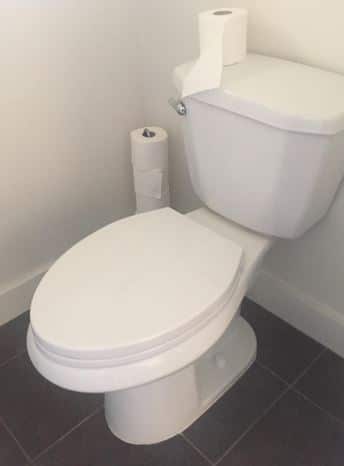
Below is a step-by-step guide on how to install a toilet from scratch. You will either have a one-piece or a two-piece toilet. Installing a two-piece toilet takes longer since you must install the bowl than the tank. It is, however, advantageous because you can install it all on your own.
With a one-piece toilet, the bowl and the tank are joined together, so you will have to install it in one go. It takes less time to install, but some one-piece toilets are so heavy that you will need an extra pair of hands to help you install the toilet. Some people still install them all alone, but there is always a danger of dropping and breaking the toilet.
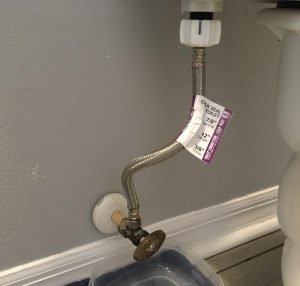
Step 1: How to Install a Toilet Shut Off Valve
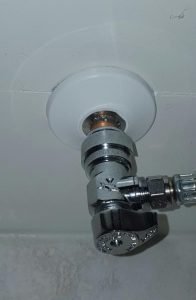
A toilet shut-off valve is a small knob installed on the wall behind the toilet. It provides you with a way to turn off the water flow to the toilet when doing toilet repairs without having to turn off the main house water supply.
This is how you install the toilet shut-off valve:
- The water supply pipe will protrude a couple of inches into the bathroom but will be plugged off. You will therefore need to cut the pipe about 2 inches from the wall.
- Before that, shut off the water to the main house. If there is a bathtub or sink in the bathroom, turn on its water to drain the water already in the pipes.
- Place a small bucket under the toilet water pipe and give it a clean cut. Some water will start dripping into the bucket, so wait until the pipe is completely drained.
- The toilet shut-off valve is designed in such a way that you will not need to thread the pipe. It has a steel nut and brass ring installed between the valve and the nut. The nut is reverse-threaded so that the brass ring will be deformed when you tighten it, making a watertight seal.
- Put the chrome plate in the pipe and push it to the end. Its work is aesthetics.
- Put the nut in the pipe so that its threads are facing outwards.
- Push the brass ring inside the nut.
- Bring on the shut-off valve and reverse-tightening the nut until it’s snug.
- Use wrenches to tighten the valve in place completely.
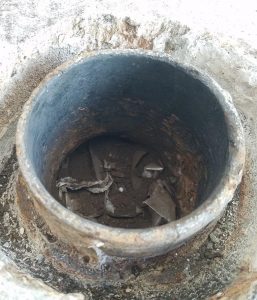
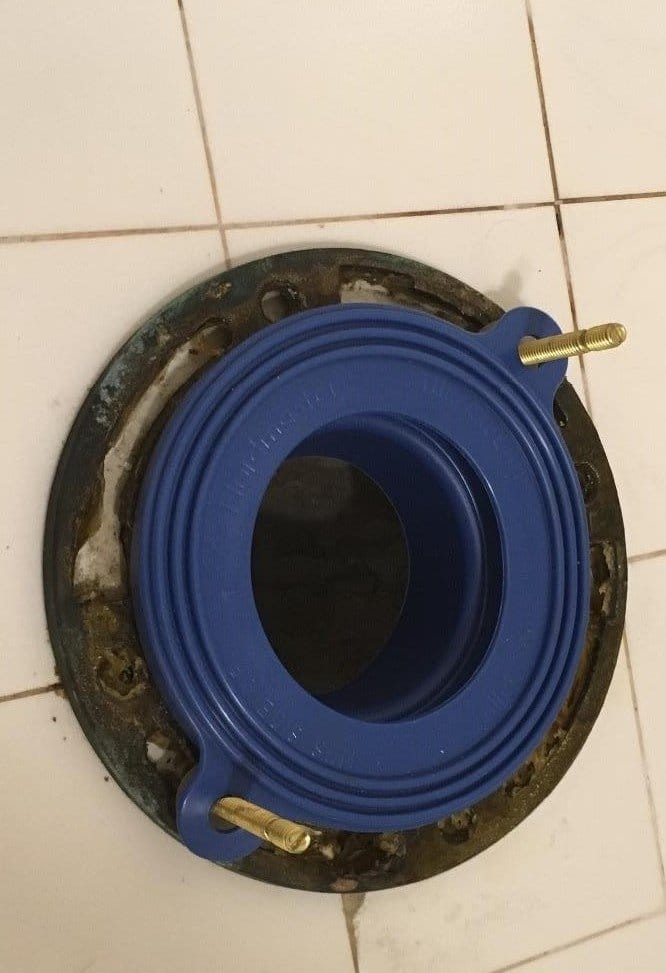
Step 2: How to Install a Toilet Flange
A toilet flange is a circular pipe fitting that connects the bottom of the toilet to the toilet drainpipe. It is also called a closet flange since toilets were known as water closets in the past.
Toilet flanges are universal. They have a 3 or 4 inches diameter that fits into the drainpipe. Be sure to measure the size of your drainpipe before buying a flange.
While installing a toilet from scratch, the drainpipe will protrude up about 5 inches from the floor. You will therefore need to cut it flush off the floor. Ideally, the toilet flange should be ¼ inch above the bathroom floor.
Modern drainpipes are made of PVC, which is easy to cut. Old toilets had a Cast iron drainpipe which was hard to cut off.
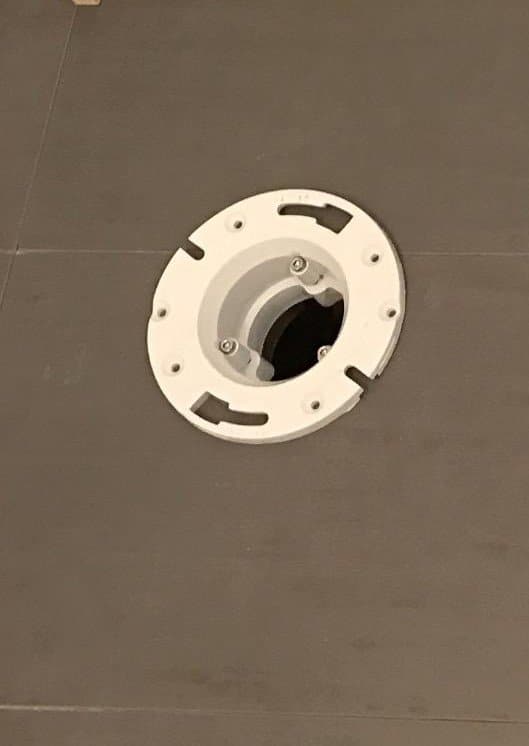
Here is how to install a toilet flange.
- Measure the distance from the floor to the top of the drainpipe.
- Put your internal pipe cutter into the drilling machine and adjust the height to that measured above.
- Cut the drainpipe cleanly all around from the inside of the pipe.
- If you don’t have a drilling machine or an internal pipe cutter, use a saw to cut the pipe off nicely. This might be a little harder, but not impossible.
- Use an emery cloth or putty knife to clean inside and around the drainpipe.
- Try fitting the flange on the drainpipe and see if it fits perfectly.
- Toilet flanges must be installed in a certain orientation. To do this effectively, imagine the flange as a wall clock. The toilet bolts must be precisely in the 3 and 9-clock positions. The flange has two rectangular slots. You just put the head of the bolts through these slots, then push them to the end of the narrow sections.
- Once you have established that the flange is fitting well, remove it and apply glue on it and the drainpipe.
- Put it back in the drainpipe and align it properly.
- Slide in the toilet bolts and move them to the narrow ends of the flange slots.
- Put a washer on top of each bolt.
- The flange must be screwed down to the floor using a 3/4 screw. Use the drilling machine to screw it into place.
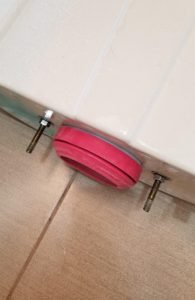
Step 3: How to Install a Wax Ring
- Some people prefer to set the wax ring on top of the flange and install the toilet straight on it.
- A better and sure way to do it is to tilt the toilet or to lay it gently on its side and set the wax ring on the toilet outlet. This way, you will be sure your wax ring will not shit during installation.
- Using a rubber gasket seal, you will set it straight on the flange and install the toilet. Some rubber gasket seals have 2 holes you slot in the toilet bolts to prevent them from shifting while installing a toilet.
Step 4: How to Install a Toilet Bowl
If you install a one-piece toilet, you will install the bowl and the tank together. With a two-piece toilet, you will install the tank later.
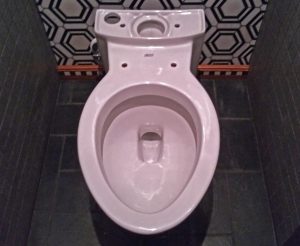
- Lift off the toilet bowl and bring it above the flange.
- Lower the toilet gently to align the holes at the base to the toilet bolts.
- When aligned, put the toilet down gently.
- Hold the bowl with both hands and press it down while rocking it a bit to engage the wax ring fully.
- Put a washer and nut on each bolt and hand tighten until snug. Use the adjustable wrench to tighten the bolts alternatingly to keep the toilet level. Do not, however, tighten it too much lest you crack the bowl.
- Cut off the protruding ends of the toilet bolts and cap them off

Step 5: How to Install a Toilet Tank
A toilet tank is joined to the bowl using 2 and sometimes 3 bolts. The bolts normally come preinstalled on the tank, and you will only need to install and tighten them on the bowl.
- Install the toilet tank to the bowl gasket. This gasket is installed at the bottom of the toilet tank and around the flush valve. It prevents the toilet tank from leaking where it is joined to the tank during flushing. It is making sure that the gasket completely covers the flush valve lock nut. A toilet tank to bowl gasket is sometimes referred to as a spud washer.
- Lift off the toilet tank and mount it on top of the bowl. You will now need to tighten it from underneath the toilet bowl.
- On the protruding bolts underneath the bowl, put in a rubber washer, steel washer, and a nut. Hand tight until snug.
- Use a wrench to tighten the two bolts alternatingly to keep the tank level on the bowl. Again, do not tighten too much to avoid cracking the bowl.
- Look inside the tank and make sure the valves are all in position. Fix the flapper properly on top of the flush valve opening.
- Connect the water supply line from the shut-off valve to the toilet tank. The coupling that connects to the tank should only be hand-tight. Using a wrench on it may deform it.
Step 6: Test the New Toilet.
- Turn on the water supply and let the toilet tank fill with water.
- Flush the toilet a couple of times.
- Check for leaks at the toilet’s base and between the bowl and the tank.
- When everything stays dry, you successfully install a toilet from scratch.
- Put the toilet tank lid on top of the tank.
Step 7: How to Install a Toilet Seat

Most toilets are sold without toilet seats. You are therefore forced to buy one separately. All toilet seats are not designed the same, so installing them will also be different.
For a basic toilet seat, this is how to install it. If you have a soft close toilet seat, whether top fixing or bottom fixing, this is how to install it.
Step 8: Caulk the Toilet
Some people prefer to caulk the toilet, while others don’t like it at all. The decision ultimately comes down to the homeowner’s preference.
Check out this post if you want to know why you should caulk around your toilet.