Toilet Leaking From Tank Bolts? Here Is How To Fix It!
Last Updated on August 3, 2023 by toilethaven
If you ever notice water pooling around the base of your toilet, most likely, it is a result of a leaking wax ring, but it could also be that your toilet is leaking from the tank bolts.
A toilet tank is joined to the bowl using 2 or sometimes 3 bolts. To avoid leaking, rubber washers are normally installed together with the bolts from the inside of the tank.
With time, the toilet tank bolts become loose and corroded, or the rubber washers are worn out, resulting in a leaking toilet tank.
To fix leaking toilet tank bolts, start by trying to tighten them, especially if the tank is wobbling. If, however, the bolts are old and corroded or if the washers are worn out, replace the bolts, washers, and tank-to-bowl gasket.
Living in an area with hard water makes you more likely to experience this problem than people with soft water.
While replacing toilet tank bolts, it is also a good practice to replace the toilet tank with a bowl gasket. This gasket is normally installed on the outside of the flush valve where the tank sits on the bowl. It is also called a spud washer.
The spud washer prevents leaking between the toilet tank and the bowl every time you flush the toilet. Any time you notice your toilet leaking between the tank and the bowl, you will need to replace the spud washer. Replacing it while replacing toilet tank bolts means you don’t need to replace it again for a couple of years.
It is, however, not every time you have leaking toilet tank bolts that you are supposed to replace them. If you have a wobbly toilet tank as a result of loose bolts, tightening them might be the only thing you need to do.
How to Fix a Wobbly Leaking Toilet Tank
- Find the tank bolt nuts underneath the bowl.
- Use an adjustable wrench to tighten them.
- If instead of tightening, they are spinning, you will need to access inside the tank.
- Turn off the water to the toilet. You will find the shut-off valve on the wall behind the toilet. Turn it clockwise.
- Flush the toilet.
- Remove the toilet tank lid.
- Use a screwdriver to hold the bolt’s head from inside the tank while you tighten the nuts underneath the bowl with your other hand.
- Check if the tank stops leaking.
If the toilet tank bolts have stopped leaking, you are home and dry. If, on the other hand, they are still leaking or you want a long-term fix, you need to replace them.
How to Replace Toilet Tank Bolts
Removing and replacing toilet tank bolts means that you will also remove the toilet tank and install it later. This is, however, an easy job and should take you between 30 minutes and 1 hour.
Materials Needed
- Adjustable wrench
- Hacksaw blade (optional)
- Flathead screwdriver
- Sponge
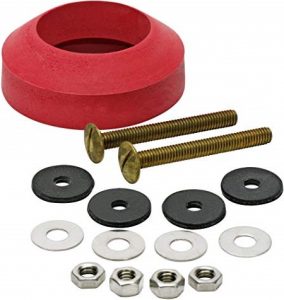
- Tank bolts, nuts, and washers
- Toilet tank to bowl gasket (optional)
Step 1: Empty the Tank
- Turn off the water to the toilet. To do this, you will need to turn the shut-off valve clockwise, but if you have a push/pull valve, pull it all the way out.
- Flush the toilet and hold the handle down to remove as much water as possible.
- Remove the toilet tank lid and place it away in a safe place where it cannot fall off and break.
- Use a sponge to soak up the little water left at the bottom of the tank and squeeze it into the bowl.
- Disconnect the water supply line from the tank. Do not disconnect the supply line with a wrench unless the coupling is very tight.
Step 2: Remove the Toilet Tank
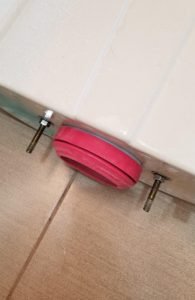
- Use the adjustable spanner to loosen the tank bolts. You will do this from under the bowl, where you will locate the nuts.
- If the bolts are spinning about instead of loosening, you will need to incorporate a screwdriver.
- Insert the screwdriver in the tank and engage the toilet bolt head while loosening the nut using the wrench with your other hand.
- If the toilet tank bolts are corroded or too tight, you will need to cut the nuts off. Since the space is too small to accommodate a hacksaw, use a hacksaw blade to cut the nuts.
- Lift off the toilet tank and place it on its side on top of a towel or rag.
- Your tank bolts will still be connected to the tank using another set of nuts and washers. Use the screwdriver and the wrench also to disconnect them.
- Remove the toilet tank to the bowl gasket and inspect it for damages. You can reuse it if it looks in fairly good condition. Otherwise, you will need to replace it.
Step 3: Replace the Toilet Tank Bolts
Toilet tank bolts come with rubber and metal washers. While replacing them, make sure that the rubber washers are in contact with the tank’s body. This helps create a water-tight seal and absorbs shock in case you tighten the bolts, preventing it from cracking.
- Put a metal washer followed by a rubber washer on each bolt and push them through the holes from the inside of the tank.
- The bolts will protrude on the bottom of the tank. Put in a rubber washer followed by a metal washer and a nut on each bolt, and hand tighten until snug.
- Use a wrench to tighten the bolts but do not tighten too much, as this might crack the porcelain.
- Install the toilet tank to the bowl gasket and ensure it covers the entire flush valve nut.
Step 4: Install the Toilet Tank
- Lift off the toilet tank and guide the bolts through the toilet bowl mounting holes until it’s sitting pretty on top of the bowl.
- Put a rubber washer followed by a metal one and a nut on each bolt and hand tighten them.
- Use an adjustable wrench to tighten the bolts alternatingly. It is important to ensure that you tighten the bolts alternatingly in order to keep the tank level on the bowl.
- Remember not to tighten the bolts too much so you end up cracking the tank.
Step 5: Connect Back the Water
- Connect the water supply line back to the toilet tank. Remember that this connection should always be hand-tight. Using the wrench could be oval and therefore damage the coupling.
- Open the shut-off valve and let the water fill the tank.
- Watch if the toilet tank has stopped leaking.
- If both the floor and the outside of the tank remain dry, then you can put the lid back on top of the toilet and continue enjoying your throne.
And basically, that is how to replace toilet tank bolts. Leaking toilet tank bolts should be fixed as soon as they start leaking. Apart from wasting water and making your bathroom untidy, if the problem is left unfixed for a long time, it may result in the rotting of the floor or subfloor.
FAQs
1. Are toilet tank bolts universal?
Yes. Toilet tank bolts are of standard dimensions and can be used to install any toilet tank.
2. How much will a plumber charge you to replace your toilet tank bolts?
Replacing toilet tank bolts includes removing and reinstalling the toilet tank. A plumber will charge you an average of 100 dollars for that.