How to Replace a Leaking Toilet Tank to Bowl Gasket
Last Updated on July 27, 2023 by toilethaven
Is your toilet leaking between the tank and the bowl after flushing? You most likely have a problem with the toilet tank to bowl gasket, also called a spud washer. The aim of this post, therefore, is to teach you how to replace a toilet tank with a bowl gasket in the simplest way possible.
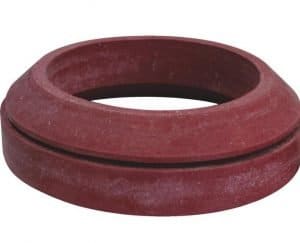
The toilet tank-to-bowl gasket is a rubber seal that allows water from the tank to go through the flush valve and enter the bowl without leaking. If you have noticed water leaking between the tank and the bowl after flushing, the problem is most likely the gasket, which you will need to replace.
Replacing the toilet tank to bowl gasket involves 3 steps:
- Removing the toilet tank
- Buying and changing the gasket
- Installing the toilet tank
Toilet tank to bowl gaskets are universal, although flush valves are different sizes. Most flush valves have a diameter of 2 inches, but some toilets have flush valves with diameters of 3 or even 4 inches.
The first thing you need to do is determine the size of your flush valve. That will help you know what tank-size bowl gasket to buy.
To replace a toilet tank to bowl gasket, turn off the water to the toilet, flush the toilet, and remove the toilet tank. Slide out the old gasket and slide in the new one. Install the tank and turn the water back on. Make sure there are no leaks.
Materials Needed to Replace Toilet Tank to Bowl Gasket
- Long flathead screwdriver
- An adjustable wrench
- Rag/old towel
- New gasket
- Bolts and washers (optional)
- A sponge
- A bucket
Replacing the toilet tank with a bowl gasket is always a good chance to replace the tank bolts and washers. Toilet tank bolts often get corroded and hence the need to replace them.
Also, the bolts and nuts are backed up by two washers each. A metallic and a rubber washer. The rubber washer should always be the one in contact with the tank. This is to prevent the tank from cracking in case of overtightening during installation.
The rubber washers also prevent the toilet from leaking from around the toilet bolts. It is important to replace these washers as they tend to wear out primarily due to hard water minerals in the toilet tank water.
How to Replace a Toilet Tank to Bowl Gasket
After gathering all the required items, it is time to get down to business. I should add that while doing this repair, you can consider replacing all the toilet tank parts.
Fixing the tank completely instead of replacing one part at a time is a good idea. Apart from saving on time and cost, replacing all the toilet tank parts will have your toilet flushing better than before.
You can also take this time to paint the back of the toilet tank. Most people are always looking to do it but are unable to, but now would be a perfect time since the tank will be out of the way.
Now let us look at how to replace a toilet tank with a bowl gasket in detail.
Step 1: Remove the Toilet Tank
A toilet tank is normally, by design, placed above the toilet bowl. This makes flushing easy by utilizing the force of gravity. A water supply line from the shut-off valve is connected to the tank through the toilet fill valve. The tank is connected to the bowl by two or three bolts.
Follow these steps to remove the toilet tank:
- Turn off the water supply. There are two types of shut-off valves. For the first valve, you turn it clockwise to prevent water from flowing into the tank. The second type of valve is where you pull it outward to close and inwards to open.
- Flush the toilet. While flushing the toilet, it is important to hold the lever down until all the water is flushed down.
- Remove the toilet tank lid and place it safely where it cannot fall off and crack.
- Using the sponge, mop out all the water that could not have been flushed down. Make sure the toilet tank is dry.
- Disconnect the supply line from the tank. Always do it with your hand, and only use the wrench if the coupling is too tight. A wrench can deform the threads of the plastic coupling.
- Use the bucket to drain any water that might have been trapped inside the water supply line.
- Once the supply line is out of the way, use the adjustable wrench to loosen the tank bolts’ nuts from underneath the bowl.
- If the entire bolt is swiveling, instead of loosening, use the long screwdriver to unscrew the bolt from the inside of the tank and back off the nut from underneath the tank with the wrench.
- Cut off the nuts with a hacksaw blade if the above doesn’t work.
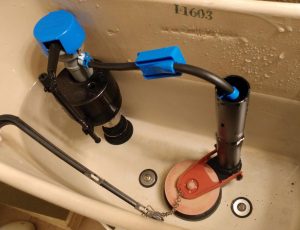
- Once the bolts are out, lift off the toilet tank and place it on its side or upside down on the rag or towel.
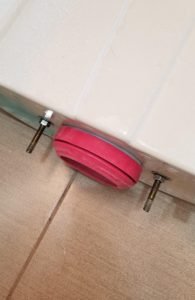
- Slide out the old gasket from the tank.
Step 2: Buying and Installing the New Gasket
Once you have removed the old gasket, clean it and inspect it for any defects. Although reuse/repair of a gasket is not encouraged, sometimes the leak is caused by more than just the wearing out of a gasket. Check also the condition of the flush valve nut in case it is damaged and needs replacement.
The flush valve nut is the large nut where the tank-to-bowl gasket is installed. If it is broken, you will need to replace the entire flush valve. This is how to replace a toilet flush valve.
The toilet tank rubber washers also cannot be reused. In this case, buying the gasket, bolts, nuts, and washers as a complete kit is best to avoid any near-future repairs.
Make sure that you buy the correct size of tank to bowl gasket. They are not all of the same size.
The size of the toilet tank to bowl gasket depends on the size of the flush valve. Flush valves have a diameter of between 2 and 4 inches. Measure the size of the flush valve to determine the size of the gasket needed.
Fluidmaster and Korky have some of the best universal toilet tank-to-bowl gaskets and other toilet tank repair kits.
Once you have the gasket ready, installing it is easy. Just slide it back the way the old one was. Slide it all the way and make sure it fits over the flush valve nut.
Step 3: Installing the Toilet Tank
When installing the toilet tank, the most important thing is the arrangement of the washers. The best practice is to use metallic and rubber washers. The rubber washers should always be the ones in contact with the tank.
If you are happy with the new gasket, proceed to install the toilet tank as follows:
- Push a metallic washer followed by a rubber washer inside the bolt and slide it through one hole at the bottom of the toilet tank. Do the same for the second bolt.
- From the protruding ends of the bolts at the bottom of the tank, put a rubber washer on each bolt, followed by a metallic washer.
- Screw in a nut on each bolt until it is tight against the washers
- Use the screwdriver to tighten the bolt while backing off the nut with a wrench. Do the same for the other bolt. Do not, however, tighten too much, as this could crack the toilet tank.
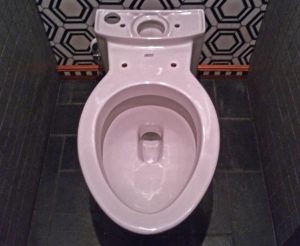
- Lift the toilet tank and fix it on top of the toilet bowl. Guide the two bolts through the two holes in the toilet bowl.
- Proceed to feed the washers and nuts as before. A rubber washer followed by a metallic washer followed by a nut. Do it for both bolts.
- Hand tight both nuts to the washers.
- Use your wrench to tighten the nuts enough not to break the toilet. Always tighten the bolts alternatingly to keep the tank level on top of the bowl.
- Connect back the water supply line to the toilet tank.
- Put back the toilet tank lid.
- Open the water shut-off valve and let the water fill the tank.
- Flush the tank a couple of times and check for any leakage between the toilet tank and the bowl.
- If all is good, then Congratulations! You now know how to replace a toilet tank with a bowl gasket.
While replacing the tank to bowl gasket, there is a chance that the toilet flapper came off from its position. Before opening the water inlet valve, please take time to make sure it is sitting pretty above the flush valve opening.
Conclusion
Most people will struggle with a leaking toilet at some part in their life. Knowing how to diagnose the type of leakage is halfway to solving the problem. As a result, most people who can’t do this pay a lot of money to plumbers to fix these problems for them. As we have seen, if you know how to replace the toilet tank with a bowl gasket, among other toilet repairs, you can save good money.
FAQs
1. Why is my toilet leaking from the bottom of the tank?
The rubber gasket between the tank and the bowl is worn out or damaged. The rubber seal prevents flush water from leaking where the tank is joined to the bowl. It will need to be replaced.
2. How do I fix a leaking toilet tank bolt?
Toilet tanks are installed using bolts backed up by rubber washers. The rubber washers serve two purposes. They prevent water from leaking through the bolt’s holes and help prevent the tank’s breaking during installation. If the bolts are loose or the washers are worn out, you will need to either tighten the bolts or replace the bolts and washers.